It is very easy to add users and groups, especially using a batch file. Open up your favourite text editor, I prefer Notepad. Just start on the first line in the document begin your commands.
Example:
net user CharlesFrozen Password01 /ADD
net localgroup "Students" /add
net localgroup "Students" CharlesFrozen /ADD
On the first line you are telling the computer that you are adding a user by the name of CharlesFrozen with the password of Password01 and you are telling the computer to add him to the user group with the /Add command.
On the second line you are telling the computer to add a group by the name of "Students" then the /ADD command.
On the third line you are telling the computer to add to the "Students" group CharlesFrozen then the /ADD command.
Now to show you how to do more users and groups:
net user CharlesFrozen Password01 /ADD
net user JessicaMiller Password01 /ADD
net user JillRobber Password01 /ADD
net user KimSheep Password01 /ADD
net user ElvisAbbot Password01 /ADD
net user MikeMeathead Password01 /ADD
net user IkeOverload Password01 /ADD
net user ClintWallpaper Password01 /ADD
net localgroup "Students" /add
net localgroup "Students" CharlesFrozen /ADD
net localgroup "Students" ClintWallpaper /ADD
net localgroup "Students" IkeOverload /ADD
net localgroup "Students" MikeMeathead /ADD
net localgroup "Students" ElvisAbbot /ADD
net localgroup "Students" KimSheep /ADD
net localgroup "Students" JillRobber /ADD
net user KeithMcRay Password02 /ADD
net user KenLasery Password02 /ADD
net user LindaHiker Password02 /ADD
net user KitFinal Password02 /ADD
net localgroup "Faculty" /add
net localgroup "Faculty" KeithMcRay /ADD
net localgroup "Faculty" LindaHiker /ADD
net localgroup "Faculty" KitFinal /ADD
net localgroup "Faculty" KenLasery /ADD
The last and final step is when saving the document is to write .bat at the end of the file name that you are saving it as, BatchAddStudentAndFaculty.bat.
To deploy just right click the file and select run. You may need to select run as administrator depending on the operating system.
Monday, December 8, 2008

Saturday, December 6, 2008
Retrieve Wireless Internet Key
Have you ever been in the situation where you needed the key back to your wireless internet key? You can remember the one of thousands of passwords you may have used for it? Well WirelessKey View has your back. It will be able to retrieve the password of all of the wireless networks you have connected to. There is no install, just run the .exe file and you are all set.
Click here to download WirelessKey (Download not work? Click here for the homepage)
Click here to read about it on Lifehacker.com
Click here to download WirelessKey (Download not work? Click here for the homepage)
Click here to read about it on Lifehacker.com
How to Start your Spooler
Went to go print a document and it wouldn't print. Went to see what the problem was and my printer spooler had stopped. What is a print spooler? It is a program that puts print jobs in order so that it can print documents one at a time, so if this stops then nothing will print.
The Solution:
1. Open a command prompt
2. Type net start spooler
3. Let the magic happen
That's it! You have now successfully started your print spooler. You should now be able to print your documents.
The Solution:
1. Open a command prompt
2. Type net start spooler
3. Let the magic happen
That's it! You have now successfully started your print spooler. You should now be able to print your documents.
Cant edit a document scenario
The scenario:
John Smith has finally reached his goal of getting his dream job as a copy writer in the Marketing department. He has been an accounting clerk for the past five years On his new PC, he has been told to login, and then navigate to the M (Marketing) drive and modify his biography. When he goes to edit the biography he finds that he is not able to edit it.
The solution:
The biography was in read only mode which means that the document can be read but not edited. To fix the problem access the biography document as an administrator and right click on the document and select properties. In the General Tab of the properties window uncheckread-only. Next click on the Securities Tab and add John Smith's user account to the Group or User Names with the access to be able to write to the document. John Smith now will be able to edit his biography in the Marketing drive.
How to apply this:
The next time you get a call at the help desk from someone in your office saying they cannot edit a document on the network, or in a shared folder, check to see if they have the correct permissions to edit the document.
John Smith has finally reached his goal of getting his dream job as a copy writer in the Marketing department. He has been an accounting clerk for the past five years On his new PC, he has been told to login, and then navigate to the M (Marketing) drive and modify his biography. When he goes to edit the biography he finds that he is not able to edit it.
The solution:
The biography was in read only mode which means that the document can be read but not edited. To fix the problem access the biography document as an administrator and right click on the document and select properties. In the General Tab of the properties window uncheckread-only. Next click on the Securities Tab and add John Smith's user account to the Group or User Names with the access to be able to write to the document. John Smith now will be able to edit his biography in the Marketing drive.
How to apply this:
The next time you get a call at the help desk from someone in your office saying they cannot edit a document on the network, or in a shared folder, check to see if they have the correct permissions to edit the document.
Wednesday, November 12, 2008
Baselining Your Vista

Till now you may not have know that this has existed and it may look a little intimidating, but there is nothing to worry about. Once you check around and play with it you will be glad you did.
To do a simple check of your performance do the following:
1. Go to start
2. In the search box type in " Reliability Performance Monitor", and click on it
3. When it opens click on "Monitoring Tools" on the left side of the window.
4. Click on "Performance Monitor". You should see now that there is a counter already going to check you Processing Time.
5. Click on the "green plus"

(click on window to expand)
Wednesday, September 17, 2008
Striped Volume
A striped volume is part of the dynamic disk storage family. It requires the use of two or more dynamic disks and up to 32 dynamic disks. One of the benefits of using striped volumes is that you are able to break up the information of a file and store it on multiple dynamic disks to increase speed of saving a file. One down side is that it is not fault tolerant, and if a disk in the striped volume fails you loose the whole volume.
Click here for more information on striped volumes provided by Google Books.
Friday, September 12, 2008
Linux Flash Drive - How to mount
I am very new to Linux. I am using Fedora Core 2 at one of the work stations here at LDSBC. It wasnt recognizing my flash drive so I "googled" for the answer and these are the steps that I found to make sure you can see the device, directory is created, and the flash drive is mapped.
Steps
1. Open Terminal on you linux machine
2. To make sure you can see the flash drive type:
less /proc/bus/usb/devices
2a. You will need to use the Up and Down arrow keys on your keyboard
to scroll through the list of devices. You should then see the description
of the device.
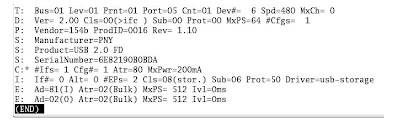
3. When you see the drive open a new terminal window and type the following.
mkdir /mnt/usb1 (type with the space, this makes the directory)
Steps
1. Open Terminal on you linux machine
2. To make sure you can see the flash drive type:
less /proc/bus/usb/devices
2a. You will need to use the Up and Down arrow keys on your keyboard
to scroll through the list of devices. You should then see the description
of the device.

3. When you see the drive open a new terminal window and type the following.
mkdir /mnt/usb1 (type with the space, this makes the directory)
mount /dev/sda1 /mnt/usb1 (this maps the drive)

4. You are done! Browse to it by going to computer on the desktop,  select file system, select mnt,
     then select Usb1 and you will see the files on your usb drive.
If you have any other tips please post them. This probably isnt the easist way to do it, but it works.
Subscribe to:
Posts (Atom)